MCP(Model Context Protocol) 소개 및 테스트
요즘 핫한 MCP(Model Context Protocol) 서버를 소개하고 직접 만들어서 테스트 해 보았다.
이 글에서는 Python을 이용하여 간단한 MCP 서버를 구현해 보고, 이를 테스트한 결과를 기록한다.
관련 페이지
- Model Context Protocol: Anthropic 사 MCP 공식 홈페이지
- Model Context Protocol servers: 공식 MCP 서버 목록
- Awesome MCP Servers: MCP 서버 목록
- Pulse MCP: MCP 서버, MCP 클라이언트 목록
- Smithery MCP server: MCP 서버 목록
MCP 소개
MCP는 Claude를 개발한 Anthropic 사에서 2024년 11월에 AI의 context(맥락) 관리를 위해 발표한 오픈 프로토콜로, LSP(Language Server Protocol)에서 영감을 받아 개발되었다고 한다.
MCP는 LLM(Large Language Model)이 필요로 하는 컨텍스트와 연결하기 위한 표준화된 방법을 제공한다. 즉, 호스트, 클라이언트, 서버 간의 표준화된 통신 프로토콜을 정의하고 있다. 참고로 통신은 JSON-RPC를 기반으로 하며, 안전하고 효율적인 데이터 및 기능 교환을 가능하게 한다.
MCP는 Anthropic에서 개발하였지만 오픈소스로 공개하였고 여러 장점과 파급력 덕분에, 현재 LSP처럼 사실상 업계의 표준이 되고 있다.
물론 MCP가 등장하기 전에도 LLM과 외부 도구를 연결하는 방법은 있었지만, 각각마다 프로토콜이 달라서 매 케이스마다 서로 통합하는 과정이 필요했다.
반면에 MCP를 사용하면 표준화된 프로토콜을 통하여 동일한 방식으로 구현하고 사용할 수 있게 되었다.
MCP 호스트, 클라이언트, 서버는 아래와 같은 역할을 한다.
MCP 호스트(Host): LLM 기반 애플리케이션 (예: Claude Desktop), AI 모델을 실행하는 주체MCP 클라이언트(Client): MCP 서버와 1:1 연결되어 통신, MCP 호스트 내에 존재MCP 서버(Server): 특정 기능이나 리소스 제공
또, 주요 콤포넌트에는 다음과 같은 것들이 있다.
Resource: AI에 더 많은 컨텍스트를 제공하는 파일 (GET 요청과 유사)Prompt: 사용자가 AI에게 더 나은 질문을 할 수 있게 도와주는 템플릿Tool: AI가 호출하는 함수로, 서버에서 작업 실행됨 (POST 요청과 유사)
아키텍쳐
MCP의 아키텍쳐는 대략 다음과 같다.
위 그림에서 볼 수 있듯이, LLM을 MCP 규격에 맞추어서 구현하면 여러 MCP 클라이언트와 연동할 수 있고, LLM 자체를 다른 LLM으로 교체할 수도 있다. MCP 서버 또한 MCP 규격으로 구현되었으므로 서로 다른 MCP 클라이언트와도 연동할 수 있다. 덕분에 사용자는 원하는 LLM을 사용하여, LLM이 여러 MCP 서버를 쉽게 사용하여 융합된 결과도 쉽게 얻을 수 있게 되었다.
MCP 클라이언트
MCP 클라이언트는 Example Clients 페이지에서 확인할 수 있다. 이 중에서 아래 환경들에서 테스트 해 보았는데, 모두 잘 된다.
- Claude Desktop
- Visual Studio Code
- Cline 익스텐션
- GitHub Copilot Chat 익스텐션
- Roo Code 익스텐션
아래와 같은 AI 에디터들에서도 마찬가지로 할 수 있다.
또, 원하면 Streamlit을 이용하여 클라이언트를 구현하고 웹 브라우저에서 구동시킬 수도 있다.
MCP SDK
쉽게 MCP를 구현하기 위해서는 언어별로 제공되는 SDK를 사용하는 것이 편리하다. 예를 들어 아래와 같이 SDK가 있다.
패키지 설치
여기서는 Python SDK를 사용할 것이므로, 아래와 같이 설치한다.
pip install "mcp[cli]"
또 Claude Desktop의 경우 디폴트로 uv 파이썬 패키지 매니저를 사용하여 MCP 서버를 실행시키는데, 이 uv 툴을 그대로 사용하려면 아래와 같이 설치한다.
Linux에서는 아래와 같이 설치할 수 있다.
$ curl -LsSf https://astral.sh/uv/install.sh | sh
Windows에서는 아래와 같이 설치할 수 있다.
C:\>powershell -ExecutionPolicy ByPass -c "irm https://astral.sh/uv/install.ps1 | iex"
ℹ️ 참고로
uv는 최신 Python 패키지 매니저로 기본적으로 가상 환경과 버전 관리를 포함하고 있어서, 기존 pip 툴보다 훨씬 편리하고 속도도 아주 빠르다. 덕분에 파이썬으로의 배포가 아주 간단하고 빨라서, 파이썬으로 구현한 MCP 서버의 배포에도 많이 이용되고 있다.
MCP 서버 작성
MCP 서버 테스트 프로그램으로 D:\MCP\my_comm.py 파일을 아래와 같이 작성하였다.
from mcp.server.fastmcp import FastMCP

# MCP 서버 생성
mcp = FastMCP("MyCommunication")

# Tool 정의: 암호화
@mcp.tool()
def encrypt(clear_string: str) -> str:
    """입력 문자열을 암호화해서 반환"""
    return ''.join(chr(ord(char) + 3) for char in clear_string)

# Tool 정의: 복호화
@mcp.tool()
def decrypt(encrypted_string: str) -> str:
    """입력 문자열을 복호화해서 반환"""
    return ''.join(chr(ord(char) - 3) for char in encrypted_string)

if __name__ == "__main__":
    mcp.run()  # MCP 서버 실행 (기본 transport=stdio)
이 MCP 서버는 다음 2가지의 tool을 제공한다.
encrypt: 입력 문자열을 암호화 (ASCII code 값에 +3 함)decrypt: 입력 문자열을 복호화 (ASCII code 값에 -3 함)
이제 MCP 호스트 프로그램에서 위에서 작성한 MCP 서버 프로그램을 실행시켜주면 된다.
Claude Desktop에서 테스트
- 아래와 같이 실행하면 Claude Desktop 설정 파일에 MCP server 설정이 추가된다.
D:\MCP>mcp install my_comm.py - Claude Desktop에서 메뉴 -> 파일 -> 설정 -> 개발자 -> “설정 편집” 버튼을 누르면 파일 탐색기에서 설정 파일의 위치가 열린다. 이 파일을 열어 보면, 아래와 같이 해당 MCP 서버 내용이 추가되었음을 확인할 수 있다.
{
  "mcpServers": {
    "MyCommunication": {
      "command": "uv",
      "args": [
        "run",
        "--with",
        "mcp[cli]",
        "mcp",
        "run",
        "D:\\MCP\\my_comm.py"
      ]
    }
  }
}
위 JSON 파일에서 보듯이 MCP 서버를 실행하는 command가
uv로 지정되었는데, 여기서 아래 예와 같이 uv 툴을 이용하지 않고 MCP 패키지를 이용하면 별도의 uv 툴은 설치하지 않아도 된다.{ "mcpServers": { "MyCommunication": { "command": "mcp", "args": [ "run", "D:\\MCP\\my_comm.py" ] } } }또는 단순히 아래와 같이 Python을 이용하여 실행킬 수도 있다.
{ "mcpServers": { "MyCommunication": { "command": "python", "args": [ "D:\\MCP\\my_comm.py" ] } } } -
이후 Claude Desktop을 완전히 종료(메뉴 -> 파일 -> 종료)한 후에 다시 실행시키면, 아래 캡쳐 예와 같이 MCP 서버가 디텍트된다. (망치 아이콘이 표시되고, 옆의 숫자는 디텍트된 tool 개수를 나타냄)

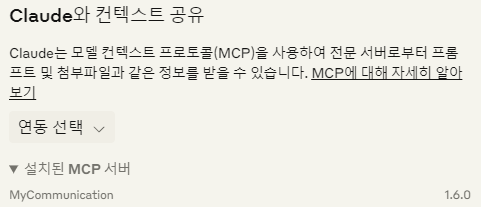
가장 오른쪽의 플러그 아이콘을 누르면 아래 캡쳐와 같이 설치된 MCP 서버를 보여준다.
또, 망치 아이콘을 누르면 아래 캡쳐와 같이 MCP tool 들의 정보를 보여준다.
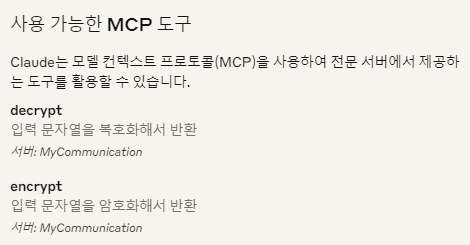
만약에 실패하는 경우에는 실패 팝업이 뜨는데, 실패 내용과 로그를 확인하여 수정하면 된다.
-
이제 관련 질문을 했을 때 LLM은 해당 질문을 처리하는데 적절한 tool을 찾고, MCP 서버를 사용하는 경우에는 아래 캡쳐와 같이 해당 MCP 서버가 제공하는 tool을 허용할지 여부를 묻는 팝업이 뜬다.
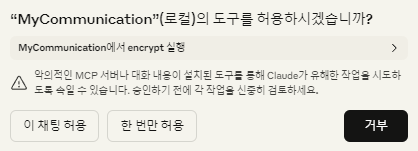
허용을 하면 해당 MCP 서버를 사용하여 (MCP 서버와 통신하는 JSON 내용도 보여줌) 답변을 한다.
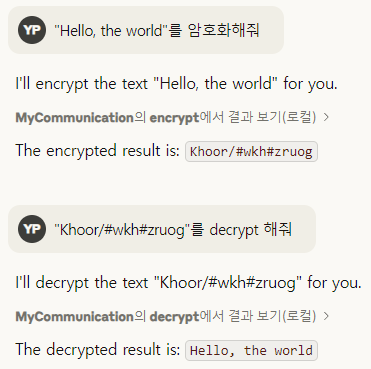
- 참고로 Claude Desktop의 MCP 로그 파일을 확인해 보면, 아래와 같이 MCP 서버와 클라이언트간의 통신 내용들이 보인다.
[MyCommunication] Initializing server...
[MyCommunication] Server started and connected successfully
[MyCommunication] Message from client: {"method":"initialize","params":{"protocolVersion":"2024-11-05","capabilities":{},"clientInfo":{"name":"claude-ai","version":"0.1.0"}},"jsonrpc":"2.0","id":0}
[MyCommunication] Message from server: {"jsonrpc":"2.0","id":0,"result":{"protocolVersion":"2024-11-05","capabilities":{"experimental":{},"prompts":{"listChanged":false},"resources":{"subscribe":false,"listChanged":false},"tools":{"listChanged":false}},"serverInfo":{"name":"MyCommunication","version":"1.6.0"}}}
[MyCommunication] Initializing server...
[MyCommunication] Server started and connected successfully
[MyCommunication] Message from client: {"method":"notifications/initialized","jsonrpc":"2.0"}
[MyCommunication] Message from client: {"method":"resources/list","params":{},"jsonrpc":"2.0","id":1}
[MyCommunication] Message from client: {"method":"tools/list","params":{},"jsonrpc":"2.0","id":2}
[MyCommunication] Message from server: {"jsonrpc":"2.0","id":1,"result":{"resources":[]}}
[MyCommunication] Message from server: {"jsonrpc":"2.0","id":2,"result":{"tools":[{"name":"encrypt","description":"입력 문자열을 암호화해서 반환","inputSchema":{"properties":{"clear_string":{"title":"Clear String","type":"string"}},"required":["clear_string"],"title":"encryptArguments","type":"object"}},{"name":"decrypt","description":"입력 문자열을 복호화해서 반환","inputSchema":{"properties":{"encrypted_string":{"title":"Encrypted String","type":"string"}},"required":["encrypted_string"],"title":"decryptArguments","type":"object"}}]}}
[MyCommunication] Message from client: {"method":"initialize","params":{"protocolVersion":"2024-11-05","capabilities":{},"clientInfo":{"name":"claude-ai","version":"0.1.0"}},"jsonrpc":"2.0","id":0}
[MyCommunication] Message from client: {"method":"prompts/list","params":{},"jsonrpc":"2.0","id":3}
[MyCommunication] Message from server: {"jsonrpc":"2.0","id":3,"result":{"prompts":[]}}
[MyCommunication] Message from server: {"jsonrpc":"2.0","id":0,"result":{"protocolVersion":"2024-11-05","capabilities":{"experimental":{},"prompts":{"listChanged":false},"resources":{"subscribe":false,"listChanged":false},"tools":{"listChanged":false}},"serverInfo":{"name":"MyCommunication","version":"1.6.0"}}}
[MyCommunication] Message from client: {"method":"notifications/initialized","jsonrpc":"2.0"}
[MyCommunication] Message from client: {"method":"resources/list","params":{},"jsonrpc":"2.0","id":1}
[MyCommunication] Message from client: {"method":"tools/list","params":{},"jsonrpc":"2.0","id":2}
[MyCommunication] Message from server: {"jsonrpc":"2.0","id":1,"result":{"resources":[]}}
[MyCommunication] Message from server: {"jsonrpc":"2.0","id":2,"result":{"tools":[{"name":"encrypt","description":"입력 문자열을 암호화해서 반환","inputSchema":{"properties":{"clear_string":{"title":"Clear String","type":"string"}},"required":["clear_string"],"title":"encryptArguments","type":"object"}},{"name":"decrypt","description":"입력 문자열을 복호화해서 반환","inputSchema":{"properties":{"encrypted_string":{"title":"Encrypted String","type":"string"}},"required":["encrypted_string"],"title":"decryptArguments","type":"object"}}]}}

[MyCommunication] Message from client: {"method":"tools/call","params":{"name":"encrypt","arguments":{"clear_string":"Hello, the world"}},"jsonrpc":"2.0","id":32}
[MyCommunication] Message from server: {"jsonrpc":"2.0","id":32,"result":{"content":[{"type":"text","text":"Khoor/#wkh#zruog"}],"isError":false}}

[MyCommunication] Message from client: {"method":"tools/call","params":{"name":"decrypt","arguments":{"encrypted_string":"Khoor/#wkh#zruog"}},"jsonrpc":"2.0","id":47}
[MyCommunication] Message from server: {"jsonrpc":"2.0","id":47,"result":{"content":[{"type":"text","text":"Hello, the world"}],"isError":false}}
VS Code에서 테스트
Copilot 익스텐션 이용
Copilot-MCP 익스텐션을 설치한 후에, MCP Server Manager에서 “Add Server”를 눌러서 MCP server 정보를 추가한다.
결과로 VSCode 설정 파일을 확인해 보면, 아래 예와 같이 내용이 추가된다. (또는 수동으로 추가해도 됨)
"mcpManager.servers": [
    {
        "name": "MyCommunication",
        "enabled": true,
        "command": "mcp run D:\\MCP\\my_comm.py",
        "type": "process"
    }
],
또는 아래와 같이 설정할 수도 있다.
"mcpManager.servers": [
    {
        "name": "MyCommunication",
        "enabled": true,
        "command": "python D:\\MCP\\my_comm.py",
        "type": "process"
    }
],
다시 MCP Server Manager를 확인해 보면, 아래 캡쳐와 같이 해당 MCP 서버가 보이고, Available Tools에 encrypt/decrypt tool이 보인다.
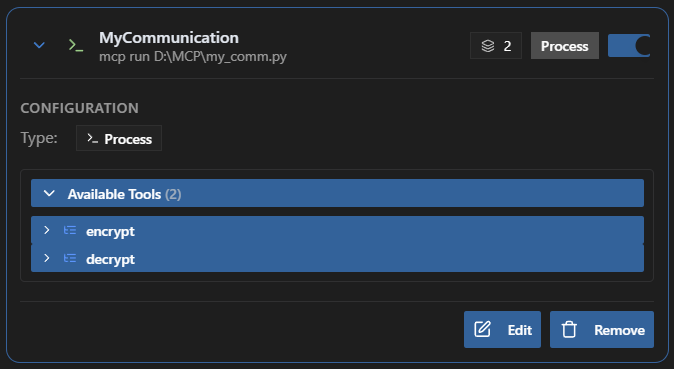
MCP client로는 GitHub Copilot Chat 익스텐션을 사용할 수 있다.
아래 캡쳐 예와 같이 VSCode의 GitHub Copilot Chat에서 @mcp 후에 내용을 요청하면 필요한 MCP 서버와 통신하여 답변을 하는 것을 확인할 수 있다.
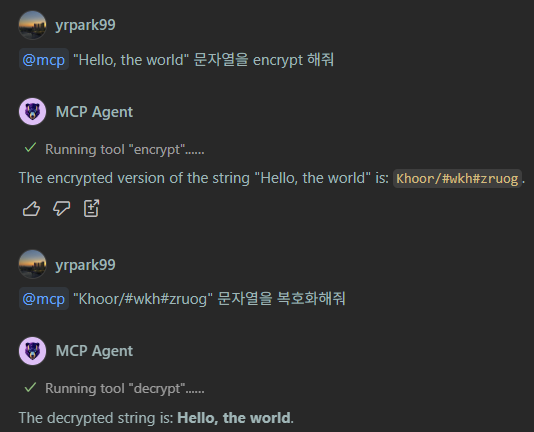
참고로 특정 tool을 직접 지정하려면 #을 치면 tool 목록들이 표시되고 선택할 수 있다.
🎉 추가로 VS Code v1.99 부터 Copilot에서 Agent mode를 지원하고, 여기에서 MCP 서버도 지원한다. 따라서 더 이상 Copilot-MCP와 같은 별도의 익스텐션을 사용할 필요도 없게 되었다.
Copilot을 열고 Agent 모드로 변경하면 아래 캡쳐와 같이 발견된 MCP tool의 개수가 표시된다. (자동으로 Claude Desktop 설정을 인식함 😲)

위에서 툴 모양의 버튼을 누르면 아래 캡쳐와 같이 발견된 tool의 상세 정보가 표시되고, 마찬가지로 AI에게 암호화/복호화를 요청하면 기대대로 이 tool을 사용하여 답변을 한다.

Cline 이용
Cline 익스텐션을 설치한다.
이후 CLINE 메뉴의 “MCP Servers” 아이콘을 누른 후, “Installed” 탭에서 “Configure MCP Servers” 버튼을 누르면 Cline의 MCP 서버 설정 파일(cline_mcp_settings.json)이 열린다. 이 MCP 서버 설정 파일에 아래와 같이 추가하면 된다.
{
  "mcpServers": {
    "MyCommunication": {
      "command": "python",
      "args": [
        "D:\\MCP\\my_comm.py"
      ]
    }
  }
}
이후 관련 요청을 하면 아래 캡쳐처럼 정상 동작함을 확인할 수 있다.
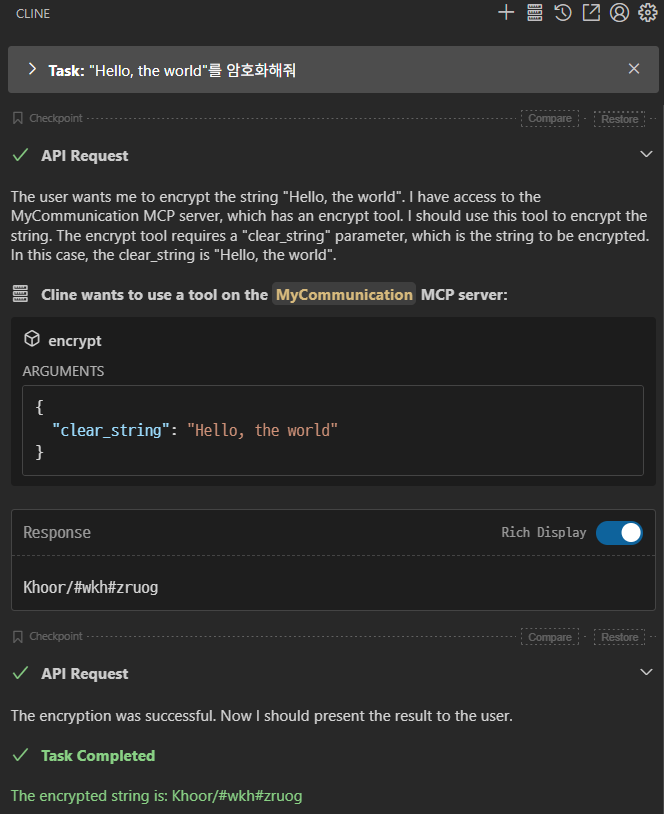
Roo Code 이용
Roo Code 익스텐션을 설치한다.
이후 ROO CODE의 MCP Servers 아이콘을 누른 후, “Edit Global MCP” 버튼을 누르면 MCP 설정 파일이 열리는데, 여기서 아래 예와 같이 작성한다.
{
  "mcpServers": {
    "MyCommunication": {
      "command": "python",
      "args": ["D:\\MCP\\my_comm.py"],
      "disabled": false
    }
  }
}
결과로 ROO CODE의 MCP Servers 아이콘을 누르면 아래 캡쳐와 같이 MCP 서버와 제공하는 tools 들이 보인다.
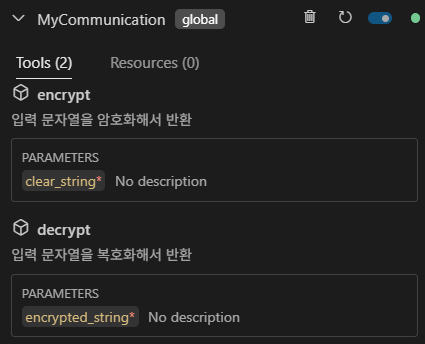
마찬가지로 Root Code의 프롬프트에서 암호화/복호화 요청을 하면 잘 동작하는 것을 확인할 수 있다.
VS Code 자체 내장
VS Code 1.102 버전부터 MCP Servers 기능을 자체적으로 내장 지원하므로, 이제 별도의 익스텐션을 사용하지 않고도 편리하게 이용할 수 있게 되었다. ❤️
MCP Inspector로 테스트
참고로 MCP 서버 개발시 MCP Inspector를 사용하여 테스트와 디버깅을 할 수 있다.
내 MCP 서버 예를 들면, 콘솔에서 아래와 같이 실행한다.
npx @modelcontextprotocol/inspector python my_comm.py.py
정상적으로 실행되면 아래와 같은 콘솔 메시지가 보인다.
Starting MCP inspector...
⚙️ Proxy server listening on port 6277
🔍 MCP Inspector is up and running at http://127.0.0.1:6274 🚀
웹브라우저로 http://127.0.0.1:6274 주소에 접속하면 MCP Inspector 화면이 보이는데, 왼쪽 패널에서 Connect 버튼을 누르면 해당 MCP 서버에 접속된다. (“Connected” 메시지가 표시되면 성공)
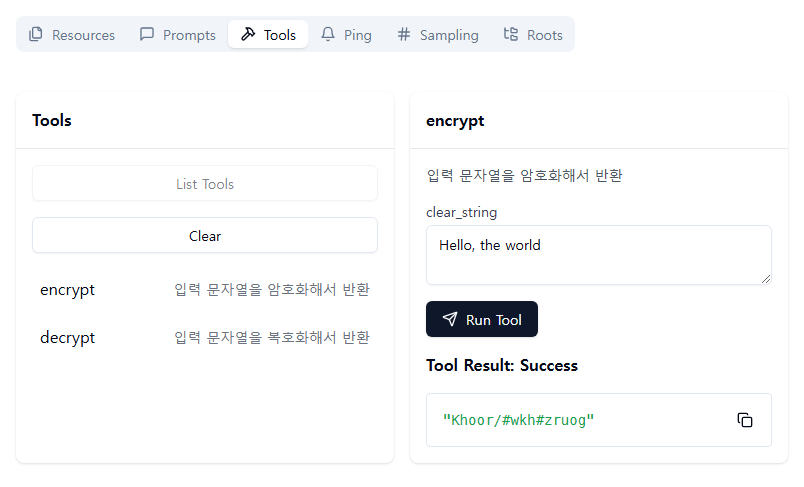
이후 Tools 탭에서 List Tools 버튼을 누르면 디텍트된 tool 들이 표시되고, 테스트하려는 tool을 클릭한 후에 해당 tool을 테스트할 수 있다. (아래 캡쳐 예 참고)
맺음말
MCP가 발표되고 나서 많은 MCP 서버/클라이언트 등이 만들어졌는데, 사용자는 덕분에 AI에게 쉽게 필요한 도구(tool)를 주고 원하는 작업을 시킬 수 있게 되었다(마치 개인 비서를 둔 것처럼).
앞으로도 다양한 MCP 서버 등이 많이 발표될 것인데, 여기서는 직접 간단한 MCP 서버를 만들어보고 테스트해 본 결과를 기록하였다.

