
JSON-RPC 정리
JSON-RPC 사용법을 정리해 본다.
RPC
RPC(Remote Procedure Call)는 프로세스 간 통신(Inter-Process Communication)의 한 형태로, 클라이언트-서버 관계로 요청/응답하는 프로세스간의 함수 호출 시스템이다.
RPC 서버와 클라이언트 간의 RPC 호출 흐름도는 Guru990 페이지에 보면 다음 그림으로 잘 설명되어 있다.
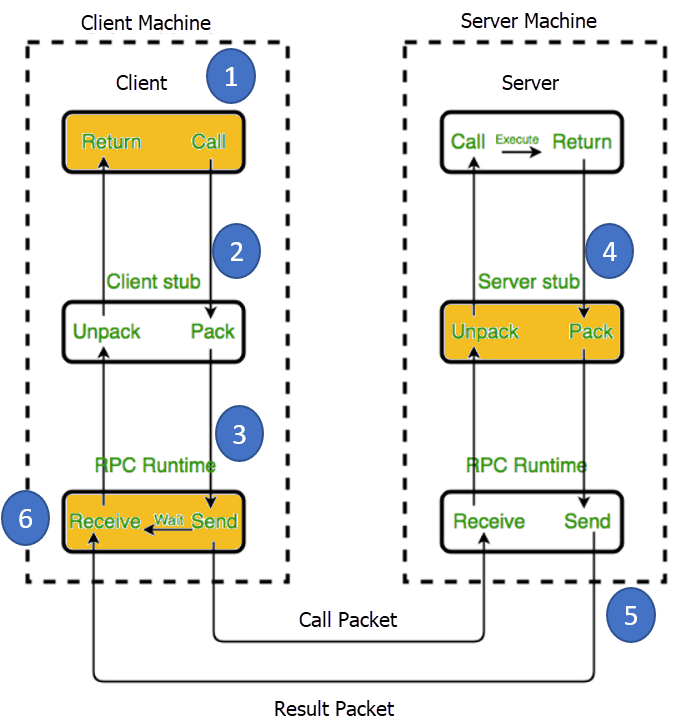
참고로 클라이언트와 서버는 물리적으로 서로 다른 컴퓨터일 수도 있고 (다른 기종이어도 됨), 동일한 컴퓨터 내에 서로 다른 프로세스일 수도 있다.
RPC 구현체
RPC는 네트워크 소켓을 이용하여 구현할 수 있겠지만, 위 RPC 호출 흐름도에서 보듯이 구현해야 할 사항들이 꽤 많으므로, 이미 구현된 오픈 소스를 사용하는 것이 편리하다.
오픈 소스 중에서 RPC 패키지를 찾아보면, 서버와 클라이언트 간에 통신하는 데이터 형식에 따라 아래 3가지 유형과, 각각에 여러 패키지들이 있다. (아래는 패키지들은 C/C++을 지원하는 패키지들을 나열한 것들임)
- XML 데이터를 이용하는 방식 (
XML-RPC) - JSON 데이터를 이용하는 방식 (
JSON-RPC) - 바이너리를 이용하는 방식
XML-RPC 방식은 가장 오래된 방식으로, 나는 오래 전에 프로젝트에서 XmlRpc++를 이용하여 프로세스 간의 함수 호출에 사용하기도 했었다.
JSON-RPC 방식은 XML보다 간결한 JSON 형식을 이용하고, 대부분의 프로그래밍 언어에서 JSON을 쉽게 사용할 수 있으므로, XML-RPC 방식을 대체하기에 좋다.
이번에 프로젝트에서 RPC가 필요하여 새로이 JSON-RPC를 사용해 보았고, 이 글에서는 JSON-RPC와 gRPC의 예제 중심으로 간단히 정리해 본다.
JSON-RPC 스펙
아래 페이지들에서 JSON-RPC 스펙을 볼 수 있다.
JsonRpc-Cpp 패키지
사전 설치
이 패키지는 JSON dev 패키지를 사용하므로, Ubuntu 배포판인 경우에는 사전에 아래와 같이 JSON dev 패키지를 설치해야 한다.
$ sudo apt install libjsoncpp-dev
패키지 빌드
아래와 같이 패키지 소스를 다운받아서 빌드한다.
- 아래 예와 같이 원하는 버전의 소스를 다운받아서 압축을 푼다.
$ wget https://sourceforge.net/projects/jsonrpc-cpp/files/latest/download -O jsonrpc-cpp-0.5.tar.bz $ tar xfj jsonrpc-cpp-0.5.tar.bz2 - 압축을 푼 디렉토리로 이동한 후, 아래와 같이 설정한다.
$ ./autogen.sh $ ./configure - 아래와 같이 빌드한다. (단, g++ v9.5.0 이상에서는 에러가 발생하는데, v9.4.0 이하에서는 에러없이 정상적으로 빌드됨)
$ make
기본 예제
예제 소스는 examples 디렉토리에 들어있다. (아래 실행 예 참조)
- 아래와 같이 서버 프로그램을 실행시킨다.
$ examples/tcp-server - 다른 터미널에서 아래와 같이 클라이언트 프로그램을 실행시킨다.
$ examples/tcp-client - 결과로 서버 터미널에는 아래와 같이 출력되고,
Receive query: {
    "id" : 1,
    "jsonrpc" : "2.0",
    "method" : "print"
}
클라이언트 터미널에는 아래와 같이 출력된다.
Query is: {"id":1,"jsonrpc":"2.0","method":"print"}
Received: {"id":1,"jsonrpc":"2.0","result":"success"}
params 사용 예제
패키지에 params 사용 예제는 없어서, 아래와 같이 예제로 Add() 함수를 작성해 보았다.
- test-rpc.h 파일에 아래 내용을 추가한다.
bool Add(const Json::Value& root, Json::Value& response); - test-rpc.cpp 파일에 아래와 같이 테스트 코드를 추가한다.
bool TestRpc::Add(const Json::Value& root, Json::Value& response) { Json::Value params; int a, b, sum; std::cout << "Add: " << root << std::endl; response["jsonrpc"] = "2.0"; response["id"] = root["id"]; params = root["params"]; if ((!params.isArray()) || (params.size() != 2) || (!params[0].isInt()) || (!params[1].isInt())) { std::cout << "Invalid params" << std::endl; response["result"] = false; return true; } a = params[0].asInt(); b = params[1].asInt(); sum = a + b; response["result"] = sum; return true; } - test-server.cpp 파일에 아래 내용을 추가한다.
server.AddMethod(new Json::Rpc::RpcMethod<TestRpc>(a, &TestRpc::Add, std::string("add"))); - tcp-client.cpp 파일에서 아래 예와 같이 테스트 코드를 작성한다.
/* build JSON-RPC query */
Json::Value params;
params[0] = 12;
params[1] = 34;
query["jsonrpc"] = "2.0";
query["id"] = 3;
query["method"] = "add";
query["params"] = params;
queryStr = writer.write(query);
std::cout << "Query is: " << queryStr << std::endl;
if(tcpClient.Send(queryStr) == -1)
{
    std::cerr << "Error while sending data!" << std::endl;
    exit(EXIT_FAILURE);
}
/* wait the response */
if(tcpClient.Recv(responseStr) != -1)
{
    std::cout << "Received: " << responseStr << std::endl;
}
else
{
    std::cerr << "Error while receiving data!" << std::endl;
}
AnyRPC 패키지
패키지 빌드
- 아래와 같이 소스를 다운받는다.
$ git clone https://github.com/sgieseking/anyrpc.git - 아래와 같이 설정한다.
$ cd anyrpc $ mkdir build $ cd build/ $ cmake-gui .. - 이제 아래와 같이 빌드한다.
$ make
내 테스트 예제
- 함수 파라미터 전달 예: Client 단에서 RpcClient_func1()를 호출하면, server 단의 func1()이 실행된다.
Client 단 소스void RpcClient_func1(int param1, int param2) { Value params, result; params["param1"] = param1; params["param2"] = param2; client->Notify(__func__, params, result); }Server 단 소스
void RpcServer_func1(Value& params, Value& result) { int param1 = params["param1"].GetInt(); int param2 = params["param2"].GetInt(); func1(param1, param2); } - result를 배열로 받기 예: Client 단에서 RpcClient_func2()를 호출하면, server 단의 func2()가 실행되고, result를 받는다.
Client 단 소스void RpcClient_func2(struct test_struct *test) { Value params, result; bool success; params.SetNull(); success = client->Call(__func__, params, result); if (success == true) { test->member1 = result[0].GetInt(); test->member2 = result[1].GetInt(); } }Server 단 소스
void RpcServer_func2(Value& params, Value& result) { struct test_struct test; func2(&test); result.SetArray(2); result[0] = test.member1; result[1] = test.member2; } - result를 map으로 받기 예: 바로 위와 동일한 역할인데, 배열 대신에 map을 이용하여 result를 받는다.
Client 단 소스void RpcClient_func3(struct test_struct *test) { Value params, result; bool success; params.SetNull(); success = client->Call(__func__, params, result); if (success == true) { test->member1 = result["member1"].GetInt(); test->member2 = result["member2"].GetInt(); } }Server 단 소스
void RpcServer_func3(Value& params, Value& result) { struct test_struct test; func3(&test); result.SetMap(); result["member1"] = test.member1; result["member2"] = test.member2; } - Binary 데이터 전달 예: Client 단에서 RpcClient_func4()를 호출하면, server 단의 func4()가 실행된다.
Client 단 소스void RpcClient_func4(unsigned char *data, unsigned int len) { Value params, result; if (len > 0) { params["data"].SetBinary(data, len); } params["len"] = len; client->Notify(__func__, params, result); }Server 단 소스
void RpcServer_func4(Value& params, Value& result)
{
    unsigned int len = params["len"].GetUint();
    const unsigned char *data = NULL;
    if (len > 0)
    {
        data = params["data"].GetBinary();
    }
    func4(data, len);
}
그런데 binary 데이터 사용시 “Invalid escape character in string” 예외가 발생하여, 패키지 소스에서 anyrpc/src/json/jsonreader.cpp 파일의 JsonReader::ParseStringToStream() 함수에서 아래와 같이 if 0으로 막았더니 이상없이 동작하였다.
void JsonReader::ParseStringToStream(Stream& os)
{
    ...
    while (true)
    {
        char c = is_.Peek();
        if (c == '\\') // Escape
        {
            ...
        }
        else if (c == '"')     // Closing double quote
        {
            ...
        }
        else if (c == '\0')
            anyrpc_throw(AnyRpcErrorStringMissingQuotationMark,
                    "Missing a closing quotation mark in string");
#if 0
        else if ((unsigned)c < 0x20) // RFC 4627: unescaped = %x20-21 / %x23-5B / %x5D-10FFFF
            anyrpc_throw(AnyRpcErrorStringEscapeInvalid,
                    "Invalid escape character in string");
#endif
        else
            os.Put( is_.Get() );
    }
}
gRPC
gRPC 홈페이지에서 자세한 정보를 얻을 수 있다.
특징
- 데이터 직렬화를 위해 protocol buffer를 사용한다. 이는 구조화된 데이터를 효율적으로 직렬화하고 파싱하기 위한 바이너리 형식이다. 프로토콜 버퍼를 사용함으로써 데이터의 크기를 최소화하고 효율적인 네트워크 통신을 가능케 한다.
- 바이너리 프로토콜을 사용하여 하나의 connection으로 RPC 호출을 처리하므로, JSON/HTTP REST에 비해 통신 크기가 작고 속도가 빠르다.
- Protocol buffer를 기본으로 한 serializer에 HTTP2를 붙여서 만든 RPC(Remote Procedure Call) 프레임워크이다.
- C/C++, Java, Ruby, Node.js, Python, Golang 등의 언어를 지원한다.
- 패키지가 방대하고 다른 라이브러리에 의존성이 많다는 단점이 있다.
gRPC 빌드하기
먼저 아래 예와 같이 사전에 필요한 패키지를 설치한다.
$ sudo apt install build-essential autoconf libtool pkg-config
$ sudo apt install libgflags-dev libgtest-dev
$ sudo apt install clang libc++-dev
아래 예와 같이 원하는 버전의 gRPC 소스를 다운받는다.
$ git clone -b v1.19.1 https://github.com/grpc/grpc
$ cd grpc/
$ git submodule update --init
아래와 같이 설정한다.
$ cd third_party/protobuf/
$ ./autogen.sh
$ ./configure
이제 아래와 같이 빌드한다.
$ make -j
빌드가 성공했으면 시스템에 다음과 같이 설치할 수 있다.
$ sudo make install && sudo ldconfig
$ cd -
$ make HAS_SYSTEM_PROTOBUF=false
$ sudo make install && sudo ldconfig
예제 테스트
아래와 같이 빌드한다.
$ cd examples/cpp/helloworld/
$ make
빌드가 되었으면 아래와 같이 서버 프로그램을 실행시킨다.
$ ./greeter_server
Server listening on 0.0.0.0:50051
이후 다른 터미널에서 아래와 같이 클라이언트 프로그램을 실행시킨다.
$ ./greeter_client
Greeter received: Hello world